![]()
Setting up eSync Profiles
To minimize data entry, eSync saves your specifications about an individual eSync job in a sync profile. So, after you enter specifications the first time, just select the profile every subsequent time you want to sync. A profile contains information about the
source and destination databases
type of data being synched
files to include/exclude
direction
schedule
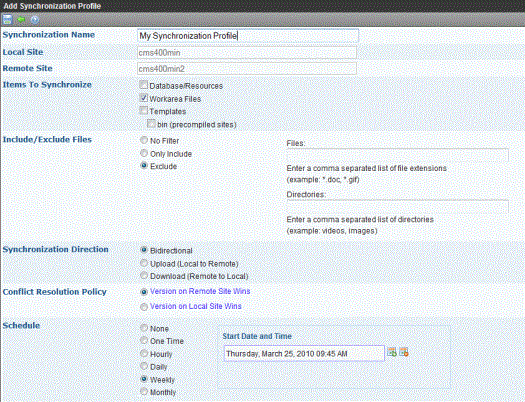
Use the Add Synchronization Profile screen to create and update eSync profiles.
While following the steps in Setting Up eSync, you created a default database and a template profile. This section explains how to modify those profiles and create new ones.
To eSync an entire Web site, you need a minimum of two profiles: one for your web site root/Workarea folder, and another for all other site files.
To create a profile for
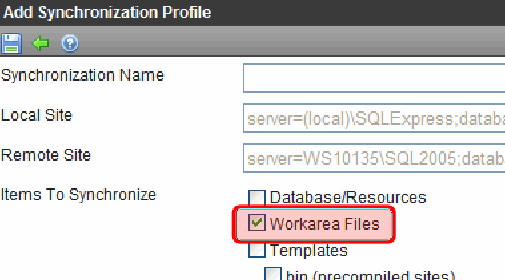
your Workarea folder, click Workarea Files under Items to Synchronize.
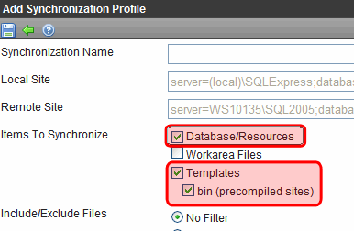
all other site files, click Database/Resources, Templates and Bin under Items to Synchronize.
The following table explains the kinds of files synched by each category.
|
Items to Synchronize |
Type of data synched |
Exceptions |
For setup instructions, see |
|
Workarea Files |
All files in the site’s Workarea folder other than the exceptions |
Files in these folders: ewebeditpro help explorer ewebdiff documents foundation resources sync See Also: Global File Type Exceptions |
|
|
Database/Resources |
The database plus the following site root folders assets Privateassets uploadedimages uploadedfiles |
||
|
Templates Warning! If you run a template sync and Bin is checked, and one server is running is 32-bit mode while the other is running in 64-bit mode, users will not be able to drag and drop DMS files on the staging server. |
All files in your site root folder other than the exceptions Note: If you perform an initial sync of a recently-installed min site with your staging site, the min site’s templates could overwrite templates on your staging site. This is because, when two templates have the same name, the most recently modified one overwrites the other. |
Files in these folders: workarea (covered by Workarea Files sync) assets, privateassets, uploadedfiles, uploadedimages (covered by Database/Resources sync) bin (covered by Bin checkbox, below) app_webreferences latestchanges app_globalresources These files: assetManagement.config web.config See Also: Global File Type Exceptions |
|
|
Bin |
The bin folder |
|
|
You can also set up a profile that syncs Windows folders. See Also: Synchronizing Windows Files
Global File Type Exceptions
The following file types are not synched by default.
.config files
.txt files
.sln files
Note: Ektron CMS400.NET creates a large number of .txt files to support the search functionality.
However, you can add these file types to a sync profile via the Include/Exclude Files field. See Also: At the Include/Exclude files field, include files not normally synched, or exclude files or directories that are synched by default.
Setting up a Profile to Sync a Database and Assets
To set up a profile to sync an Ektron CMS400.NET database and its assets, follow these steps.
Prerequisite
You created a Sync configuration and ran an initial sync. See Also: Setting Up eSync
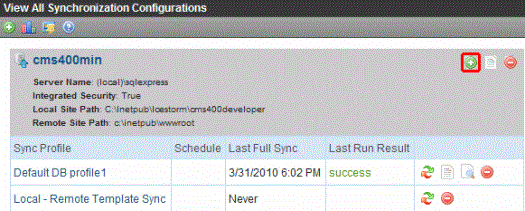
1. Go to the Settings > Configuration > Synchronization screen.
2. If you are eligible to add a profile to a configuration, the Add Sync Profile button appears, as shown below.
3. Click Add Sync Profile (![]() )(circled above). The Add Synchronization Profile screen appears.
)(circled above). The Add Synchronization Profile screen appears.
4. At the Synchronization name field, enter a name for this profile.
5. At the Items to Synchronize field, select Database/Resources.
6. At the Synchronization Direction field, select the direction of the data copy that will occur. Your choices are:
Bidirectional (that is, both directions). Changed data on either server is updated on the other. If the same data (for example, a membership user profile) is updated on both servers, the conflict resolution policy determines the outcome. See Also: Bidirectional Sync; Conflict Resolution Policy
Note: If you are using bidirectional sync and only one version was updated since the last sync, the updated version overwrites the unchanged version.
Upload - the database and assets are copied from the local server (the one to which you signed on) to the remote server (specified at the Remote Site field above). Items on the remote server are overwritten.
Download - the database and assets are copied from the remote server to the local server. Items on the local server are overwritten.
7. At the Conflict Resolution Policy field, decide what to do if Synchronization Direction is Bidirectional, and the data has changed on both servers since the last sync. Your choices are.
Version on Remote Site Wins - the remote version overwrites the local version
Version on Local Site Wins - the local version overwrites the remote version
8. If desired, select a schedule for when the sync will run automatically. The choices are
None - Don’t set up a schedule. Run this sync profile as needed via the Sync Profile screen‘s Start Now button.
One Time - you specify a start time and date
Hourly - you specify a start date and time. eSync begins on the start date and time, then runs every hour at that time.
Daily - you specify a start time and date; this sync profile will run every day at this time
Weekly - you specify a start time, date, and day. After the start date, this sync profile will run this day every week at this time.
Monthly - you specify a start time and date (numbers 1 through 31). After the start date, this sync profile will run this day every month at this time.
Warning! Do not schedule more than one sync to begin at the same time.
Note: While the above options let you schedule a sync profile, you can sync at any time by accessing the Sync Profile and clicking Sync ( ). See Also: Running a Sync
Note: If you enter a date greater than 28, the sync will not run in a month that does not include that date. For example, if you enter 31, the sync will not run in February, April, June, September, and November.
Setting up a Profile to Sync Workarea Files
Prerequisite
You created a Sync configuration and ran an initial sync. See Also: Setting Up eSync
1. Go to the Settings > Configuration > Synchronization screen.
2. If you are eligible to add a profile to a configuration, the Add Sync Profile button appears on the right side, circled below.
3. Click Add Sync Profile (![]() .) The Add Synchronization Profile screen appears.
.) The Add Synchronization Profile screen appears.
4. At the Synchronization name field, enter a name for this profile.
5. At the Items to Synchronize field, select Workarea files.
6. At the Include/Exclude files field, include files not normally synched, or exclude files
For example, .txt files are not normally included in a sync, but you want to copy several on your staging server to the production server. In this case, check Only Include and enter *.txt into the adjacent field (illustrated below). If you do, only files with that extension are synched.
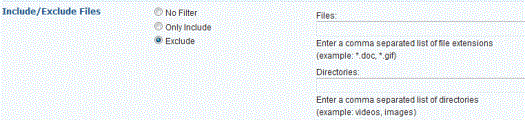
As an example of the Exclude option, assume you do not want to sync Flash (.swf) files. If you check the Exclude button, and enter .swf into the Files field, eSync ignores them.
Note: By default, eSync ignores .config and .txt files.
An another example of the Exclude option, assume you do not want to sync files in the XXX folder. If you check the Exclude button, and enter XXX into the Directories field, eSync ignores them.
When excluding, you can enter file types and directories. eSync ignores all files that satisfy either criterion.
7. At the Synchronization Direction field, select the direction of the data copy that will occur. Your choices are:
Bidirectional (that is, both directions). Changed data on either server is updated on the other. If the same data (for example, a membership user profile) is updated on both servers, the conflict resolution policy determines the outcome. See Also: Bidirectional Sync; Conflict Resolution Policy
Note: If you are using bidirectional sync and only one version was updated since the last sync, the updated version overwrites the unchanged version.
Upload - if the file on the local server was modified more recently than the one on the remote server, the local file replaces the remote. Otherwise, nothing happens.
Download - if the file on the remote server was modified more recently than the one on the local server, the remote file replaces the local. Otherwise, nothing happens.
8. At the Conflict Resolution Policy field, decide what to do if Synchronization Direction is Bidirectional, and the data has changed on both servers since the last sync. Your choices are.
Version on Remote Site Wins - the remote version overwrites the local version
Version on Local Site Wins - the local version overwrites the remote version
9. If desired, select a schedule for when the sync will run automatically. The choices are
None - Don’t set up a schedule. Run this sync profile as needed via the Sync Profile screen‘s Start Now button.
One Time - you specify a start time and date
Hourly - you specify a start date and time. eSync begins on the start date and time, then runs every hour at that time.
Daily - you specify a start time and date; this sync profile will run every day at this time
Weekly - you specify a start time and date. After the start date, this sync profile will run every week on the same day at the specified time.
Monthly - you specify a start time and date (numbers 1 through 31). After the start date, this sync profile will run every month on the same day at the specified time.
Warning! You cannot schedule more than one sync to begin at the same time.
Note: While the following options let you schedule a sync profile, you can sync at any time by accessing the Sync Profile and clicking Sync (). See Also: Running a Sync
Note: If you enter a date greater than 28, the sync will not run in a month that does not include that date. For example, if you enter 31, the sync will not run in February, April, June, September, and November.
Setting up a Profile to Sync Template and Bin Files
Prerequisite:
You created an eSync configuration and ran an initial sync. See Also: Setting Up eSync
1. Go to the Settings > Configuration > Synchronization screen.
2. If you are eligible to add a profile to a configuration, Add Sync Profile appears, as shown below.
3. Click Add Sync Profile (![]() ). The Add Synchronization Profile screen appears.
). The Add Synchronization Profile screen appears.
4. At the Synchronization name field, enter a name for this profile.
5. At the Items to Synchronize field, select Templates and Bin.
6. At the Include/Exclude files field, include files not normally synched, or exclude files
For example, .txt files are not normally included in a sync, but you want to copy several on your staging server to the production server. In this case, check Only Include and enter *.txt into the adjacent field (illustrated below). If you do, only files with that extension are synched.
As an example of the Exclude option, assume you do not want to sync Flash (.swf) files. If you check the Exclude button, and enter .swf into the Files field, eSync ignores them.
Note: By default, eSync ignores .config and .txt files.
As another example of the Exclude option, assume you do not want to sync files in the Marketing folder. If you check the Exclude button, and enter Marketing into the Directories field, eSync ignores those files.
When excluding, you can enter file types and directories. eSync ignores all files that satisfy either criterion.
7. At the Synchronization Direction field, select the direction of the data copy that will occur. Your choices are:
Bidirectional (that is, both directions). Changed data on either server is updated on the other. If the same data (for example, a membership user profile) is updated on both servers, the conflict resolution policy determines the outcome. See Also: Bidirectional Sync; Conflict Resolution Policy
Note: If you are using bidirectional sync and only one version was updated since the last sync, the updated version overwrites the unchanged version.
Upload - if the file on the local server was modified more recently than the one on the remote server, the local file replaces the remote. Otherwise, nothing happens.
Download - if the file on the remote server was modified more recently than the one on the local server, the remote file replaces the local. Otherwise, nothing happens.
8. At the Conflict Resolution Policy field, decide what to do if Synchronization Direction is Bidirectional, and the data has changed on both servers since the last sync. Your choices are.
Version on Remote Site Wins - the remote version overwrites the local version
Version on Local Site Wins - the local version overwrites the remote version
9. If desired, select a schedule for when the sync will run automatically. The choices are
None - Don’t set up a schedule. Run this sync profile as needed via the Sync Profile screen‘s Start Now button.
One Time - you specify a start time and date
Hourly - you specify a start date and time. eSync begins on the start date and time, then runs every hour at that time.
Daily - you specify a start time and date; this sync profile will run every day at this time
Weekly - you specify a start time, date, and day. After the start date, this sync profile will run this day every week at this time.
Monthly - you specify a start time and date (numbers 1 through 31). After the start date, this sync profile will run this day every month at this time.
See Also: Pausing the Sync Schedule
Warning! You cannot schedule more than one sync to begin at the same time.
Note: While the following options let you schedule a sync profile, you can sync at any time by accessing the Sync Profile and clicking Sync (). See Also: Running a Sync
Note: If you enter a date greater than 28, the sync will not run in a month that does not include that date. For example, if you enter 31, the sync will not run in February, April, June, September, and November.
Pausing the Sync Schedule
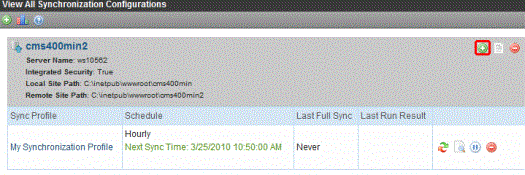
If a sync profile runs on a schedule, you can temporarily pause it. To do this click the profile's pause/play button (circled below).

While paused, the sync will not run. To resume the schedule, press the pause/play button a second time.
For example, a sync is scheduled to run every hour @ :50: 1:50, 2:50, 3:50, etc.
At 10:30 a.m., you pause the sync profile. So, at 10:50 a.m., the sync does not run .
At 12:00 noon, you click the pause/play button again to resume the schedule. In this case, the next sync will start at 12:50 p.m.
Bidirectional Sync
Although most CMS data is created and updated on the staging server, certain types of data are collected on the production server. This information can be viewed and edited on the staging server. Here are some examples:
membership users
content ratings data
forum and blog posts
community folders
When you set up a sync profile to copy this kind of data (maintained in the database), you typically would choose Bidirectional as the direction. In this case, if a membership user creates or updates his profile on the production server, those changes are transmitted to staging. On the other hand, if your administrator needs to change that membership user’s information, the next eSync transfers that from staging to production.
If changes are made to the same file on both servers since the last sync, your conflict resolution policy determines which data is saved. See Also: Conflict Resolution Policy
Note: The first time you run a sync for templates or Workarea files, the sync is bidirectional, regardless of the direction you specify on the Synchronization Direction screen.
Conflict Resolution Policy
If you are using bidirectional synchronization (See Also: Bidirectional Sync), and the same item changed on both servers since the last sync, eSync must decide which version should be kept, and which version overwritten.
Note: If you are using bidirectional sync and only one version was updated since the last sync, the updated version overwrites the unchanged version.
Use the Conflict Resolution Policy field to determine which version ends up on both servers after synchronization. The following choices are available.
Version on Remote Site Wins - the remote version overwrites the local version
Version on Local Site Wins - the local version overwrites the remote version
Synchronizing Windows Files
As an alternative to selecting a type of data to sync (using the File types radio button), you can sync individual Windows files. For example, you updated a few template files and their related .css files on the staging server, and now want to update the production server without moving everything else.
Note: If you create new HTML content and insert a Library image into it, then sync just that content, the image is not inserted into the destination library nor is it searchable from the destination site. To remedy this problem, perform a database/ resources sync.
Unlike the full sync, you cannot schedule a Windows file sync. Instead, you select files then sync immediately.
Like the profile sync, the local file replaces the corresponding remote one only if the local file was modified more recently than the one on the remote server. Otherwise, nothing happens.
To synchronize Windows files, follow these steps.
1. Create a sync configuration between the two servers whose files you want to sync. See Setting Up eSync.
2. From the View All Synchronization Configurations screen, click Add Sync Profile (![]() )(see below).
)(see below).
3. Complete the fields on the screen except for Schedule, which the file sync ignores. See Setting up a Profile to Sync Workarea Files
4. Save the profile.
5. From the View All Synchronization Configurations screen, click Synchronize files ( ) next to the profile.
6. All folders in your Ektron CMS400.NET site root folder appear. Open folders as needed, and check all files to be synched.
7. Click Sync now ( ).
).
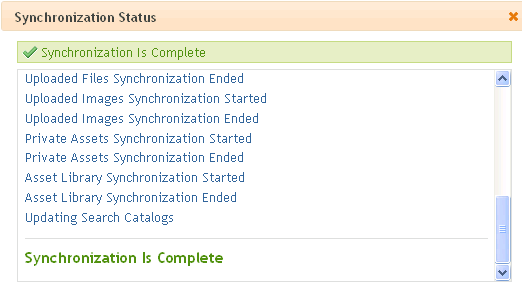
8. A dialog tracks the sync’s progress, and notifies you when it is completed.


![]()